On guitar, it's not enough to know the names of notes. You need to be able to find them quickly and confidently anywhere on the neck.
Note Location: The Magic Triangles
In this lesson, you'll learn why note location exercises are essential and how to use two simple "Magic Triangle" patterns to find the same note in multiple places on the fretboard.
Knowing where the notes are is one of the most important skills you can develop on any instrument. When you can instantly locate notes, you stop relying purely on memorised chord grips or scale boxes and start understanding what you are actually playing. It allows you to build chords from scratch, follow keys more confidently, move ideas around the neck, move ideas into different positions, and communicate clearly with other musicians.
Breaking Down the Fretboard
In the 12-tone system used on the guitar, there are 12 pitch classes within each octave. With six strings and many frets, the fretboard can initially feel like a huge amount of information to memorise.
The good news is that you do not need to treat every fret as an isolated piece of information. You also do not need to learn each string completely separately.
Instead, we can simplify the process.
Begin by learning the seven natural notes:
A B C D E F G
The remaining pitch positions are commonly named using sharps or flats. Once you know where the natural notes fall, these additional pitches become much easier to locate because they sit between most neighbouring natural notes.
The exceptions are B to C and E to F, which are already one semitone apart.
Once you know the natural notes on the sixth and fifth strings, you can use two repeatable fretboard patterns, the Magic Triangles, to locate those same notes on the remaining strings.
Before introducing the triangles, however, we need to establish the foundation properly.
Let us begin with the first step.
Step 1: Learn the Natural Notes on the Low E (6th) String
We begin with the 6th string, also known as the Low E string.
This string will act as one of our main reference points. Once you know the natural notes here, the rest of the fretboard becomes much easier to organise.
Pay attention to two key details:
There is no note between E and F
There is no note between B and C
That is why those notes appear next to each other on the fretboard.
Exercise 1 - Natural Notes (Low E)
Play every natural note in order including the open E string (0 fret) and say each note name out loud. This will help reinforce memorisation.
Below is the exercise written in a guitar tab that you can play along to if you wish.
Interactive Practice
Tab Player
Tempo: 84 BPM | Notes: quarter notes
Current target noteE
Step 2: Learn the Natural Notes on the A (5th) String
Now we repeat the exact same process on the 5th string.
The open 5th string is A. From there, the notes continue forward through the musical alphabet in order:
Exercise 2 - Natural Notes (A)
Play every natural note in order including the open A string (0 fret) and say each note name out loud. This will help reinforce memorisation.
Below is the exercise written in a guitar tab that you can play along to if you wish
Interactive Practice
Tab Player
Tempo: 84 BPM | Notes: quarter notes
Current target noteA
Step 3: Introducing the Magic Triangles
The good news is that if you have learned all of the natural notes on both the 5th and 6th strings, the hard part is already done.
Instead of repeating Steps 1 and 2 for the remaining four strings, we can use a simple formula to work them out.
We do this by dividing the strings into two distinct groups of three.
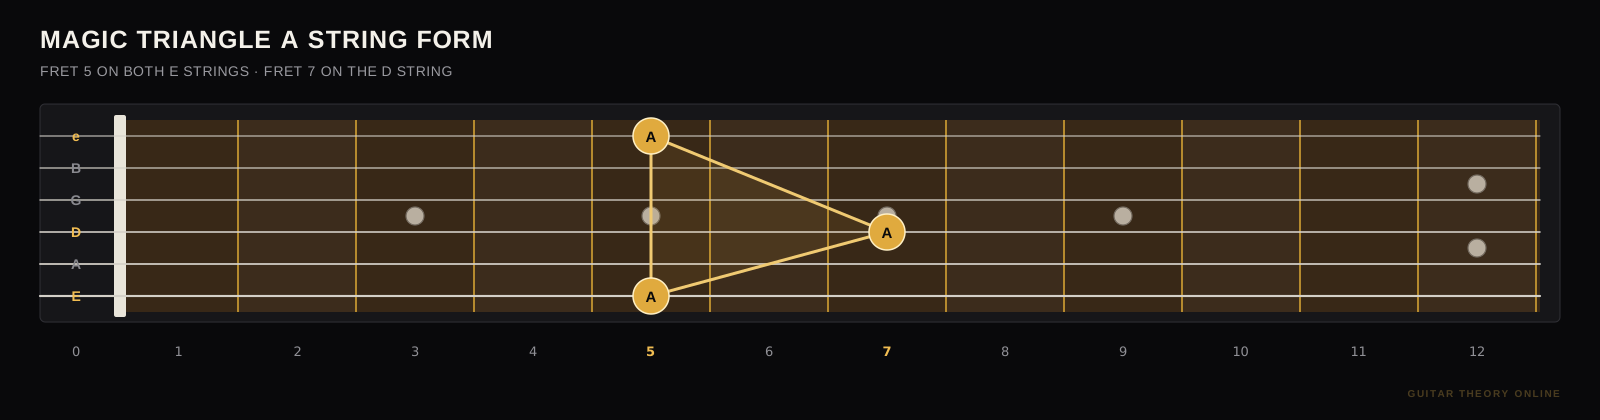
Group 1: 6th, 4th and 1st Strings
The first group contains:
6th string (Low E)
4th string (D)
1st string (High E)
Now look at the relationship between these strings.
Both the 6th and 1st strings are tuned to E. That means any note on the 6th string appears on the 1st string at the same fret.
The 4th string relates slightly differently. Any note on the 6th string will appear again on the 4th string two frets higher.
So if we describe it as a formula:
6th string (E) = x 4th string (D) = x + 2 1st string (E) = x
If a note is at fret x on the 6th string:
The same note is at fret x on the 1st string
The same note is at fret x + 2 on the 4th string
An easy way to visualise this is to imagine a triangle shape connecting those three positions across the fretboard.
You could practise this by choosing one natural note and playing it across all three strings in the triangle before moving on to the next note.
Exercise 3
Interactive Practice
Tab Player
Tempo: 84 BPM | Notes: quarter notes
Magic Triangle - Shape 2
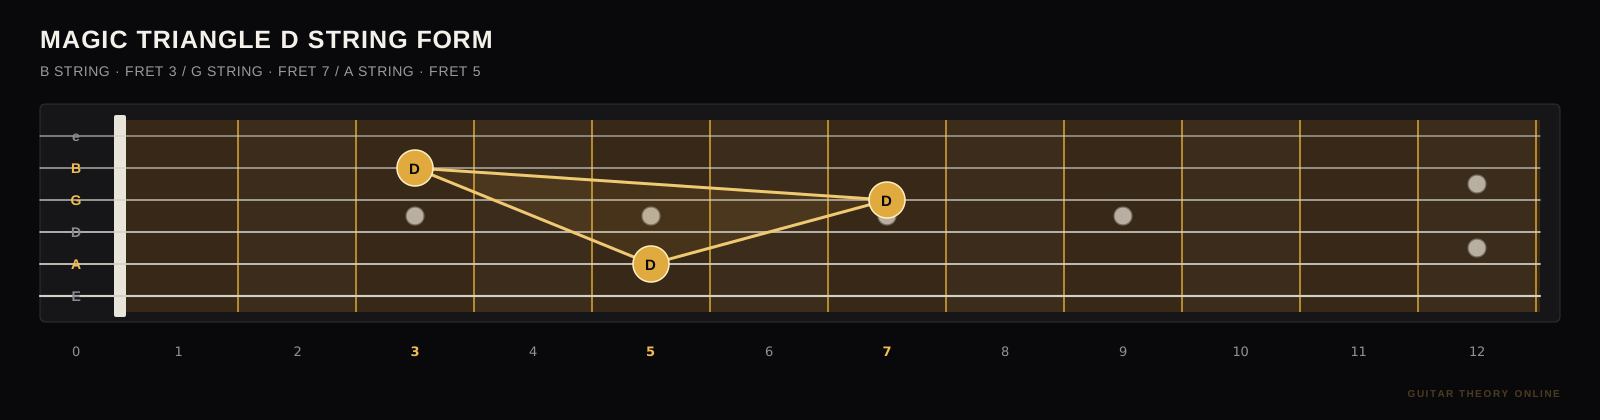
We can now repeat the same logic with the remaining group of three strings:
5th string (A)
3rd string (G)
2nd string (B)
The idea is exactly the same. We pick one reference string and use a simple formula to find the same note on the other two strings.
However, this triangle works slightly differently from the first one. In the previous group, the 6th and 1st strings were both tuned to E, so they matched at the same fret. In this group, there is no repeated A string, so the relationships shift slightly.
Here is the formula:
5th string (A) = x 3rd string (G) = x + 2 2nd string (B) = x - 2
This means:
If a note is at fret x on the 5th string:
The same note will be two frets higher on the 3rd string
The same note will be two frets lower on the 2nd string
Just like before, you can visualise this as a triangle connecting the three note positions across the fretboard.
You can practise this in the same way as the first triangle. Choose one natural note, play it across all three strings using the formula, then move on to the next note.
Exercise 4
Interactive Practice
Tab Player
Tempo: 84 BPM | Notes: quarter notes
Bringing It All Together
At this point, you have everything you need.
If you know the natural notes on the 6th and 5th strings, and you understand the two Magic Triangle relationships, you can now work out the location of any natural note across the entire fretboard.
You do not need to memorise every string separately.
You do not need to memorise all 12 notes in every position.
You only need:
The natural notes on the 6th string
The natural notes on the 5th string
The two Magic Triangle formulas
From there, everything else becomes logic.
If you can find a note on the 6th string, you can immediately place it on the 4th and 1st strings.
If you can find a note on the 5th string, you can immediately place it on the 3rd and 2nd strings.
Sharps and flats require no extra system. They simply sit between the natural notes. If you know where A and B are, then A sharp or B flat must be the fret in between. This rule applies everywhere on the neck.
The goal now is repetition.
Choose a random natural note and find it on all six strings using the triangles.
Do this slowly at first, then gradually increase speed.
Say the note names out loud as you play them.
Practise Finding Notes
You can practise this directly using the Interactive Guitar Fretboard. Select a note and use the fretboard to locate it across all six strings before revealing the answers.
What is the best way to learn the notes on the guitar fretboard?
The best approach is to learn the fretboard in stages rather than trying to memorise every note at once. Start with the natural notes on the sixth and fifth strings, then use repeatable patterns to locate those same notes elsewhere on the neck.
Spend a few minutes regularly on note-location exercises. Short, focused practice will usually produce better results than trying to learn the whole fretboard in one session.
Should I memorise every note on the guitar fretboard?
You do not need to know every note immediately, but recognising them all should be the long-term goal.
Knowing the complete fretboard makes it easier to understand chords, scales, intervals and keys without relying entirely on memorised shapes. Begin with the most useful strings and gradually expand your knowledge across the neck.
Why should guitarists learn the notes on the fretboard?
Learning the notes helps you understand what you are playing rather than relying only on chord grips and scale patterns.
It makes it easier to find root notes, build chords, follow keys, move musical ideas into different positions and communicate clearly with other musicians.
How long does it take to memorise the guitar fretboard?
There is no fixed timescale because it depends on how consistently you practise. You can begin locating useful notes quite quickly, but recognising every note automatically takes regular repetition.
A few focused minutes during each practice session is usually more effective than occasional long periods of memorisation.
How can I find the same note in different places on the guitar neck?
The same note appears in several positions because the guitar has multiple strings covering overlapping pitch ranges.
Once you know a note on the sixth or fifth string, you can use octave patterns to locate the same note on other strings. These repeatable shapes reduce the amount of information you need to memorise separately.
What are the Magic Triangle patterns on guitar?
The Magic Triangles are two visual fretboard patterns used in this lesson to find matching notes across different strings.
They begin with notes on the sixth and fifth strings and show where the same note appears elsewhere on the neck. Learning these patterns gives you a quick reference while you develop stronger note recognition.
How should I practise finding notes on the fretboard?
Choose one natural note and try to find every instance of it across a small area of the neck. Say the note name aloud as you locate it, then repeat the exercise with another note.
You can also choose random frets and identify the notes without counting from the open string. Keep the exercises short and practise them regularly until recognition becomes more automatic.